AR Collections
The AR Collections App adds the ability to manage Accounts Receivables collection efforts within Microsoft Dynamics 365 Business Central. The solution adds features to automate the email notifications of customer of past due invoices and adds a new AR Collections Role Center so individual Collection Managers can keep track of their AR collection interactions with each customer assigned to them.
Setup
App Registration
| Field Name | Description |
|---|---|
| App ID |
Specifies the AR Collections app ID. |
| Tenant ID: | Specifies the Tenant ID from D365 BC. |
| Access Level | Specifies the AR Collections app ID. |
| Installed Date | Specifies the date AR Collections was installed. |
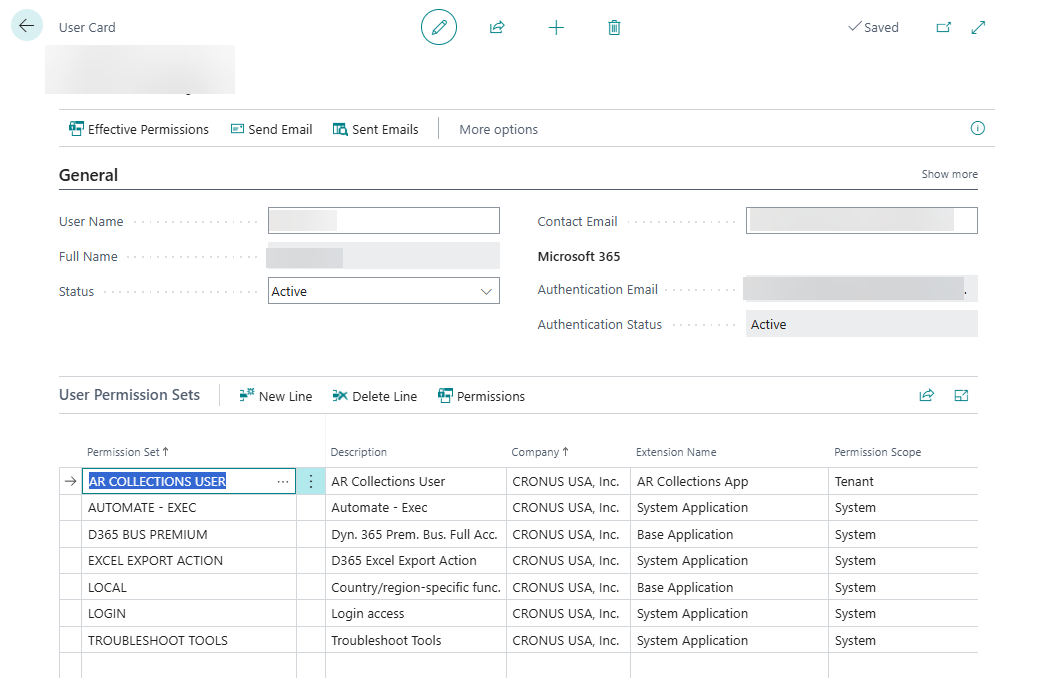
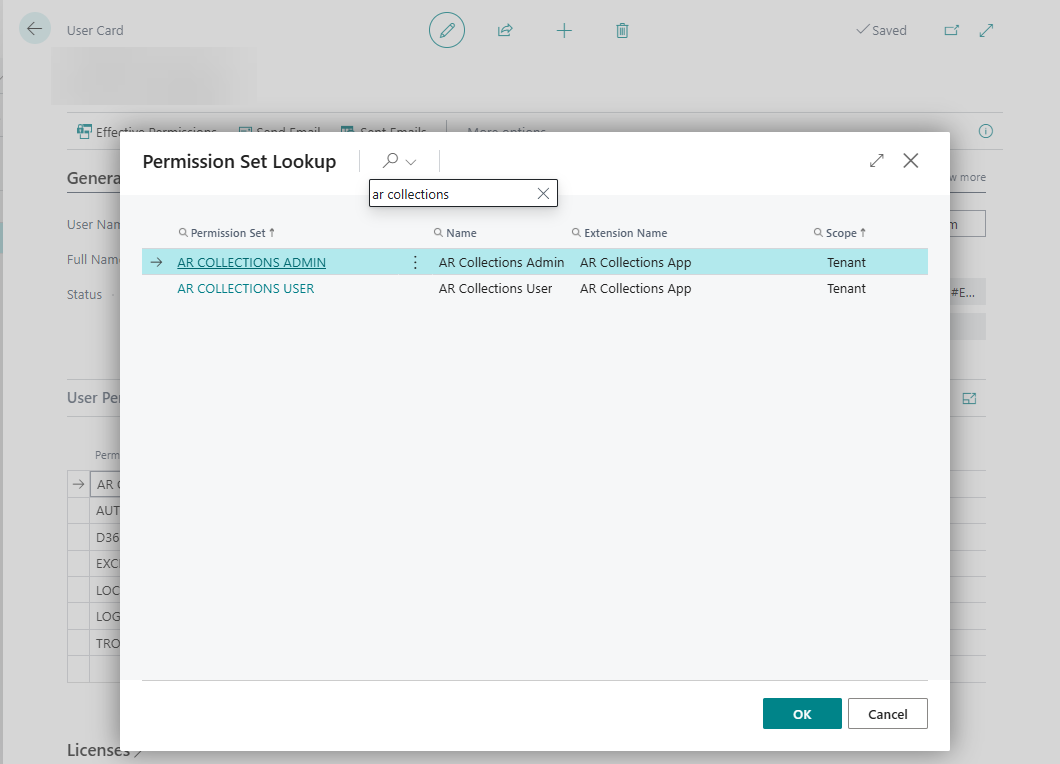
AR Collections Permissions
To ensure users have the appropriate access to complete their AR Collections tasks, assign one of the two dedicated User Permission Sets on the User Card. These Permission Sets provide the required permissions for performing all AR Collections–related functions.
| Field Name | Description |
|---|---|
| AR Collections Admin | This Permission Set, when used together with the Collections Admin option in User Setup, allows the user to view all customers in the AR Collections List and assign AR Collections Account Representatives in User Setup. A Collections Admin can also run all AR Collections reports and access all related administrative functions. |
| AR Collections User | This Permission Set, when used together with the AR Collections Account Rep page assignments, specifies the user can have access to specific customers, if entered in User Setup > AR Collection Account Reps page. |
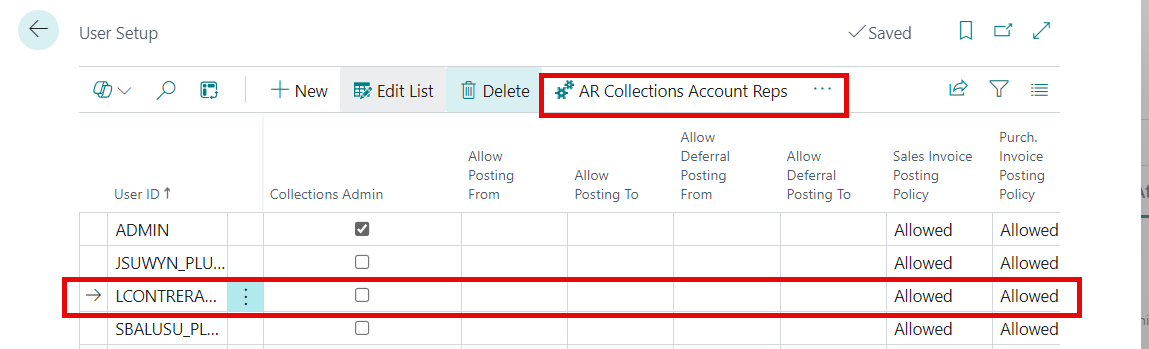
User Setup
For each user who will be using AR Collections, open User Setup and add their User ID. See below for additional steps to identify them as either a Collections Admin or a AR Collections Account Rep. .
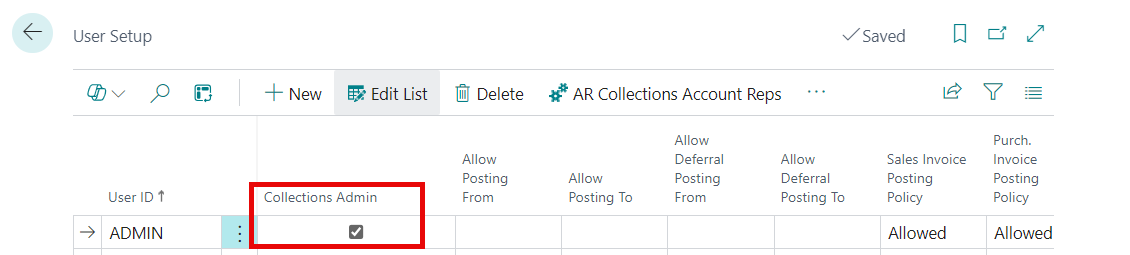
Collections Admin
| Field Name | Description |
|---|---|
| Collections Admin |
Specifies if this user is allowed to see all Customers in the AR Collections module. If not checked the user must have each customer added individually in the AR Collections Account Reps page. The Collections Admin user automatically has access to all user collection activity. |
To set a user as a Collections Admin select the Collections Admin checkbox.
AR Collections Rep
For non-Collection Admins (AR Collections Account Reps), from the User Setup page, highlight the specific user, from the ribbon and select the AR Collections Account Reps link.
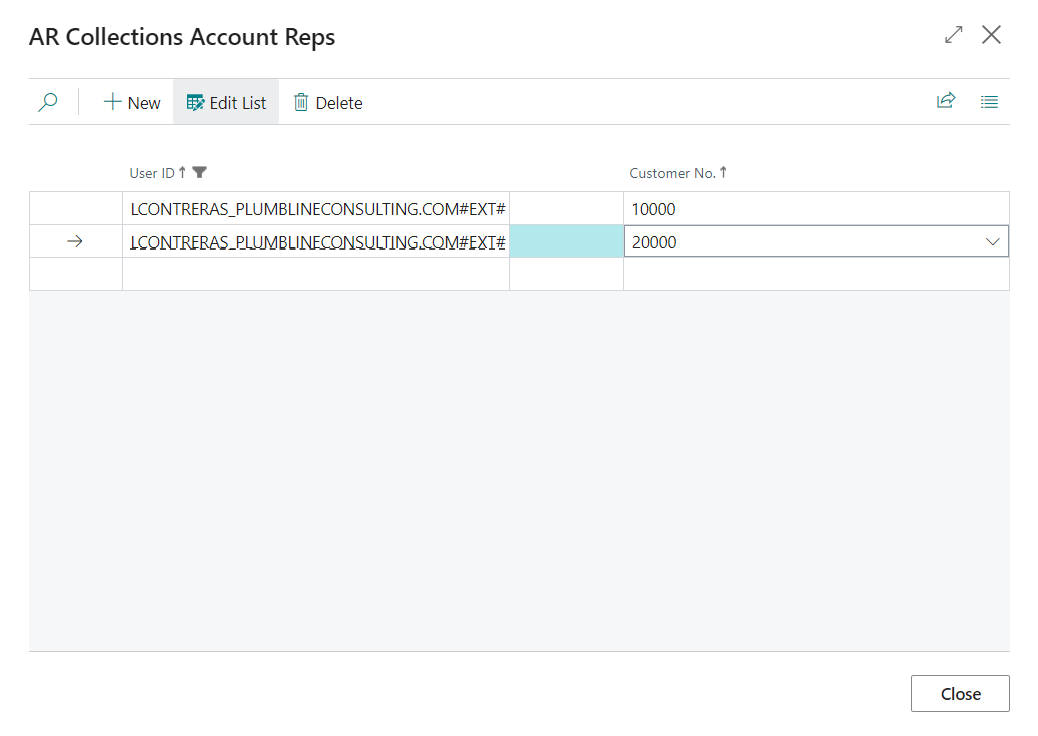
The AR Collections Account Reps page opens.
Select the Customer No drop down and assign Customers to be handled by this AR Collections Account Rep:
| Field Name | Description |
|---|---|
| User ID |
Specifies the identifier for the selected "non-Admin" user (AR Collections Account Rep). |
| Customer No. | Select the drop down and select Customer numbers to assign to this AR Collections Account Rep. |
AR Collection Setup
General FastTab
| Field Name | Description |
|---|---|
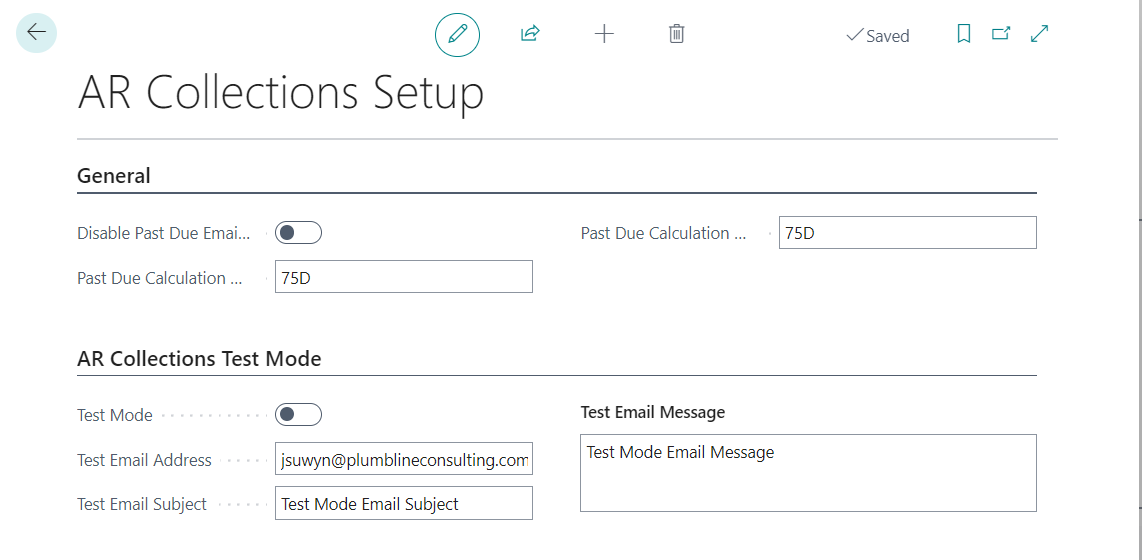
| Disable Past Due Email Notifications |
If selected (true), specifies the past due Notices will not be sent. |
| Past Due Calculation Range: Start Date | Specifies the number of days to look back from the current date for the start of the Past Due Calculation date range.This value defaults into the Past Due Start Date field on the Past Due Notice Generation page. |
| Past Due Calculation Range: End Date | Specifies the number of days to look forward from the current date for the end of the Past Due Calculation date range.This value defaults into the Past Due End Date field on the Past Due Notice Generation page. |
AR Collections Test Mode
| Field Name | Description |
|---|---|
| Test Mode |
If selected (true), specifies the Test Mode is enabled. Emails will not be sent to customers, but to the specified Test email address for testing purposes. When Test Mode is enabled, any cc: addresses specified in the AR Collection Notice Control > AR Collections Email Setup will not receive emails, until Test Mode is disabled. |
| Test Email Address | Specifies the email address to be used to send the mails when Test Mode is set to selected (true). |
| Test Email Subject | Specifies the subject to be used on manual emails. You can type in %1 to include the Customer Name as a parameter in the Email Subject. |
| Test Email Message | Specifies the Email message to be used on manual emails. |
AR Collection Notice Control
The AR Collection Notice Control serves as a governance mechanism within the Accounts Receivable (AR) collections process, ensuring that customer communications—especially collection notices—are sent accurately, consistently, and in alignment with company policy.
The AR Collection Notice Control:
- Standardizes communication by ensuring that collection notices follow approved templates and tone.
- Enforces timing and escalation rules by controlling when notices are sent, based on the invoice aging (e.g., 30, 60, 90 days overdue).
- Reduces errors and miscommunications by preventing duplicate, premature, or incorrect notices being sent.
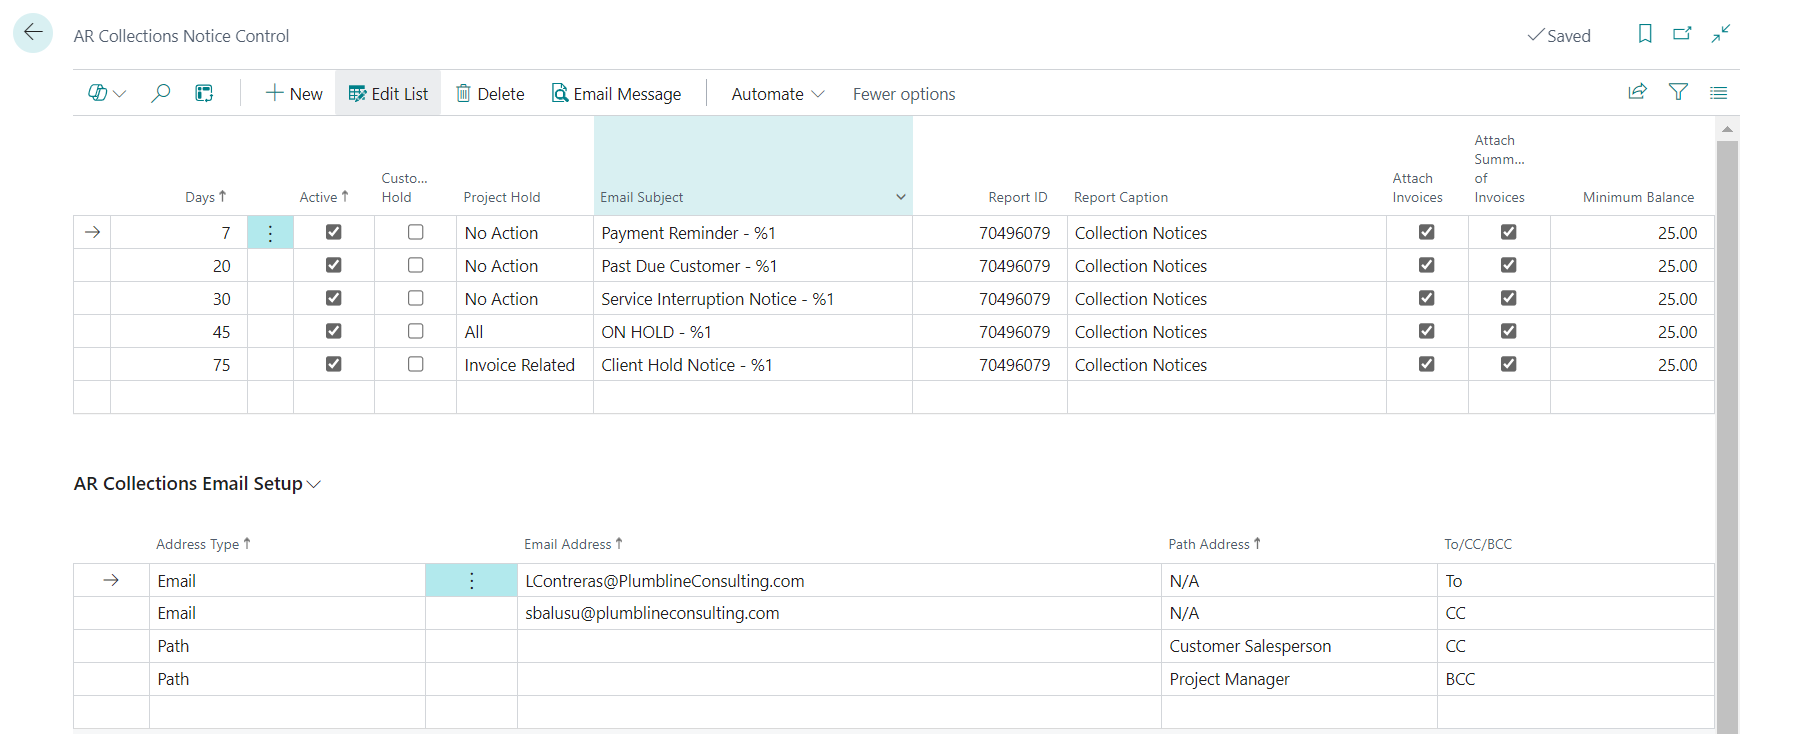
The AR Collection Notice Control enables you to configure customized email messages based on specific aging categories (in days). When an email is triggered, it evaluates the Invoice Due Date of any outstanding invoices and calculates how many days each invoice is overdue.
Depending on the configuration in AR Collection Notice Control, you can optionally place a customer on hold to block the creation of new invoices. Additional options allow you to place individual Projects or specific Invoices on hold as needed.
| Field Name | Description |
|---|---|
| Days |
The Days field defines how many days an invoice must be overdue before a Notice is triggered. The system reviews the Invoice's Due Date for any outstanding balances, categorizes them by aging period, and sends a report with messaging tailored to that specific aging category. Select a row, then select Email Message from the Ribbon to define specific email messages. For more information on the Email Message feature, see: Email Message |
| Active | Specifies the Notice is active and should be sent. |
| Customer Hold | Specifies, if selected (true), that when this number of days is reached, the customer should automatically be placed on hold. |
| Project Hold | Specifies if a customers Projects(s) should be put on hold. Options: |
| No Action: none of the Projects are put on hold. | |
| - Invoice Related: If selected, only put Invoice Related items for the Project on hold. | |
| - All: All Projects are put on hold. | |
| Email subject | Specifies the subject to be used on emails of this type. You can type in %1 to include the Customer Name as a parameter in the Email Subject. |
| Report ID | Specifies the Notice (report) that should be sent when this number of days is reached. |
| Report Caption | The name of report selected in the Summary Report ID field.. |
| Attach Invoices | Specifies whether invoice documents are automatically attached to the related email. |
| Attach Summary Report | Specifies that the selected Summary Report ID will be used to generate and attach a summary of past due invoices to the email. |
| Minimum Balance | Specifies the Minimum Balance a Customer must have in order to be sent a Notice on an invoice. |
AR Collections Email Setup
For each line specified above (in the first section of AR Collections Notice Control), you can specify one or multiple paths for the email being sent. This section lets you specify who will receive an email for each of the "days past due" lines specified above.
| Field Name | Description |
|---|---|
| Address Type |
Specifies that the email address to be CC is either the email address keyed or the path. Path can indicate the Customer, Salesperson, or Project Manager as well as the CC address, Email, Path or N/A. |
| Email Address | Specifies the email address that will be used for this position. Can only be entered if Address Type is Email. |
| Path Address | Specifies the option of which system email should be used. |
| -Customer Email: Sends email to the address on the Customer. | |
| - Customer Salesperson: Sends email to the address of the Salesperson assigned to the Customer. | |
| - Project Manager: Sends email to the address of the Project Manager for the invoices for the Customer. | |
| To/CC/BCC | Specifies the receipt type for the email if it should be sent. Specifies if the Email Address or the Path Address will be used in the To, the CC or the BCC line on the email being sent. |
Email Message
To access Email Message select the link for Email Message from the ribbon.
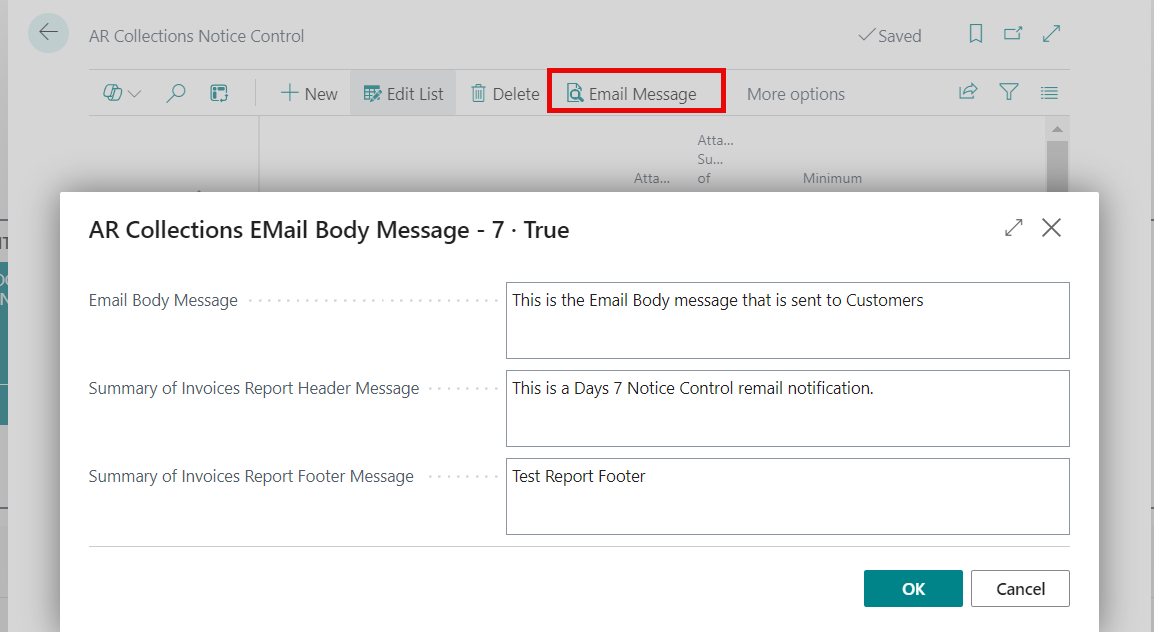
| Field Name | Description |
|---|---|
| Email Body Message |
Specifies email body message when sending Notices. |
| Report Header Message | Specifies report header message when sending Notices. |
| Report Footer Message | Specifies report footer message when sending Notices. |
Job Queue
To send emails, a Business Central Job Queue Entry needs to be created. For information about creating Job Queue Entries in Business Central, see: Job queue
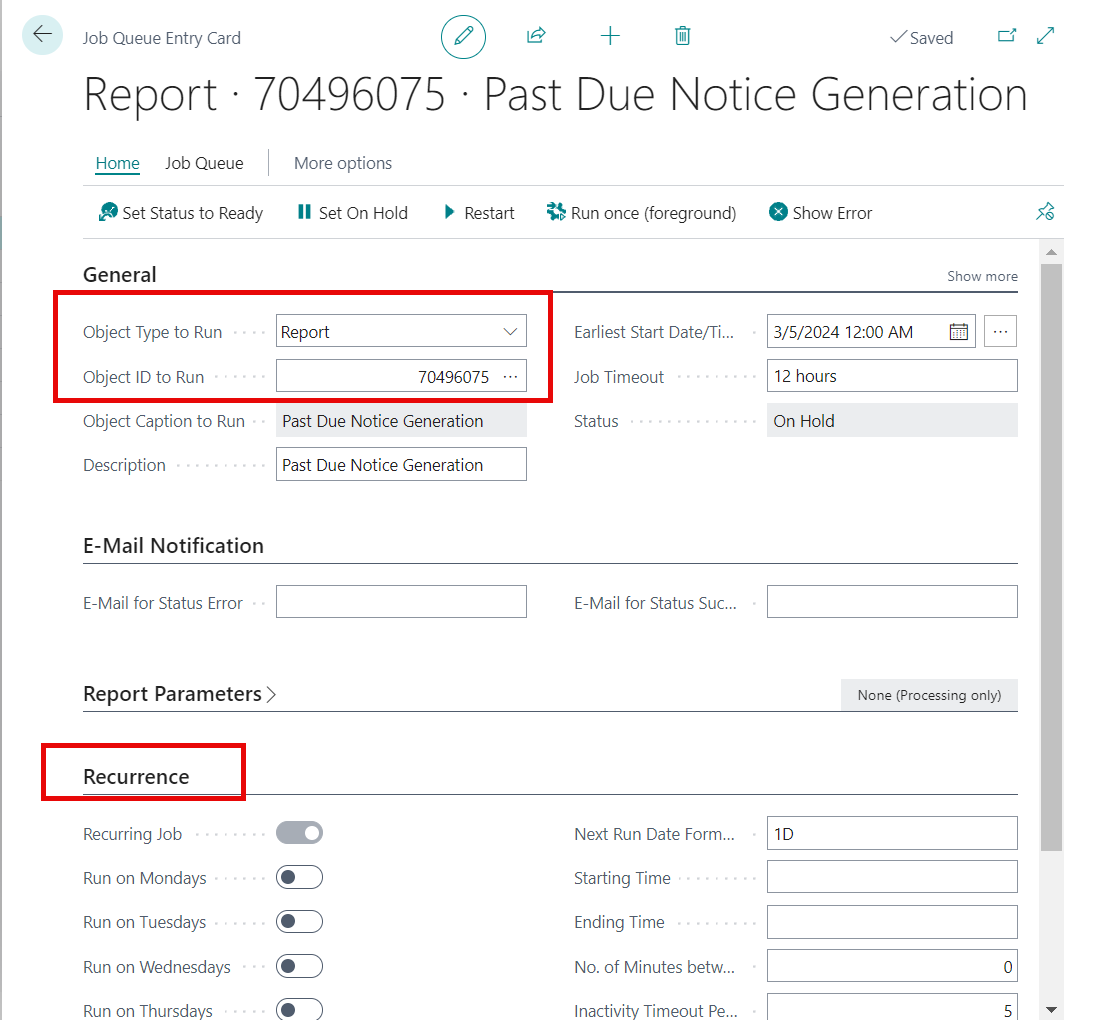
For the AR Collection Notice Control Job Queue Entry, besides the standard Business Central fields, complete the following for AR Collections Past Due Notice Generation:
- Object Type to Run: Specify Report.
- Object ID to Run: Specify 70496075.
- You will also need to specify values in the Recurrence FastTab to set how frequently the Job Queue should run, as well as other parameters.
Emails that are sent from the Job Queue will use the caption Email sent to Customer | Job Queue in the Note field of the AR Collections Card > Collection Contacts FastTab.

AR Collections - Customer Card
For information on setting up an AR Collections Card for a Customer, see: AR Collections Card